Installation of Slimline Tanks and SMALL ROUND TANKS
There are several factors that will determine the most appropriate location of your rainwater tank. First walk around your house and note the locations of your downpipes. The closer the tank is to a downpipe, the simpler your install will be.
Once you have selected an appropriate site, you can begin to prepare this site for the tank.
STEP 1: Check the relevant regulations relating to rainwater tank installation with your local council.
STEP 2: Your S-Line rainwater tank should be handled with care. When moving into position, avoid rough and sharp surfaces.
STEP 3: All Slimline Tanks must be installed on a level concrete slab (min 75mm deep) and slightly wider than tank (100mm) length and (100mm) width. Pad needs to be in range of +/- 1.0 degrees.
STEP 4: Tank must have a minimum clearance of 50mm from walls or fence
STEP 5: All threaded fittings must be hand tight only using teflon tape. Be careful not to damage the thread if using a brass tap/ball valve
STEP 6: Water tank stands can be used but must be designed by a qualified consulting engineer.
Please refer to Australian Standards Handbook for installation instructions for further information HB 230-2006
Click here for brochure – Slim and round tanks under 6000
NOTE: 1 litre of water is 1kg – hence 5000 litre tank is 5000kg or 5 tonne. Incorrect installation can be deadly. Please ensure you install your tank as per Instructions for safety and to ensure your warranty is valid.
INSTALLATION GUIDE FOR STEEL WATER TANKS
Prepare the ground for installation of your water tank – click here for Instructions Steel tank preparation
Further Information on direct and wet system:
In most cases, tank installations use PVC storm-water pipes to carry rainwater from the gutter to the tank inlet (see dry system diagram). Connecting the PVC pipe is hassle-free, and it should be glued with watertight cement. PVC pipes are inexpensive and neat and can be painted to match the colour of your home. Alternatively high-density polyethylene (HDPE) pipe may be used.
The downpipe should be directed to run downwards and the rainwater should flow into the top of the tank. There should be enough fall in the pipe to allow gravity to drain water into the tank inlet.
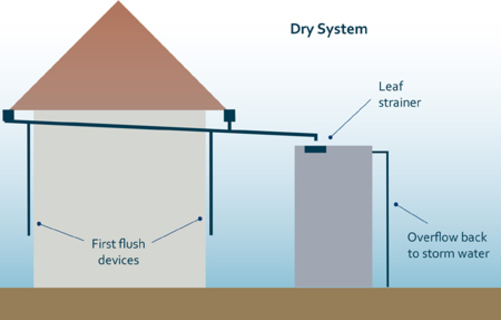
A first flush water diverter and/or a rain head can be used to keep sediment and leaves out of the tank. Called a dry system, the pipes are allowed to dry out once rain stops.
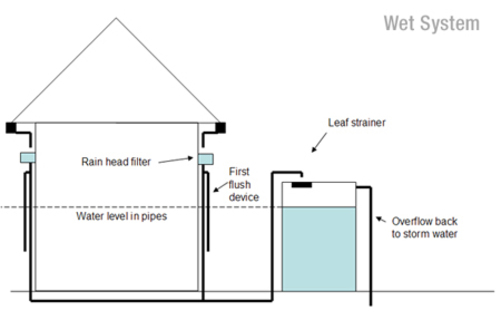
A wet system (see diagram), where water remains in the pipes after rain, connects one or more underground downpipes and carries water through an underground pipe to the tank. Wet systems rely on hydraulic head pressure to force water through sealed pipes and up into the tank inlet.
A wet system is useful for a larger roof catchment area, as the tank does not need to be located near the downpipe. It is imperative to consider the height differential between the bottom of the gutter and the top of the tank. Allow at least 500mm differential.
An important consideration is to use a filter before water enters the underground storm-water pipes. We recommend installing a first flush or a High-Flow Filter and/or Rain Head under the gutter. Inspection points should also be installed to allow a flush out, if required. Gutter guards are effective for keeping your wet system free flowing.
NOTE: 1 litre of water is 1kg – hence 5000 litre tank is 5000kg or 5 tonne. Incorrect installation can be deadly. Please ensure you install your tank as per Instructions.
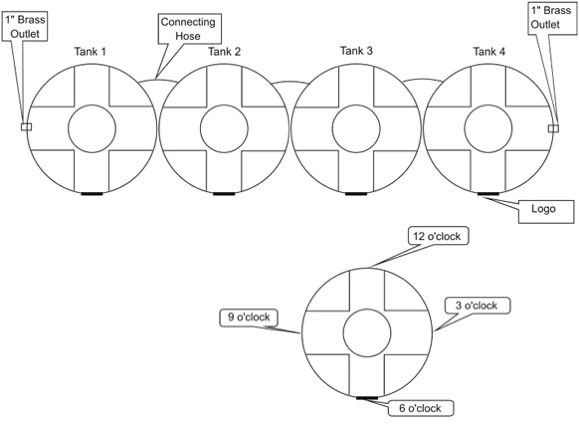
Installation Guide for JOINING MULITIPLE Round Tanks
Follow Base preparation above.
STEP 1: Line up all tanks starting with Tank 1 from your left;
STEP 2: Use Teflon tape on all directors (approximately 10 turns);
STEP 3: Screw directors (hand tied) to 1″ plastic fitting;
STEP 4: Fit hose supplied with S/S clamps;
STEP 5: Fit ball valve to 1″ brass outlet and on the other side fit plastic 3/4 plug;
STEP 6: We recommend that the overflow be installed on either: Tank 1: 9 o’clock; or Tank 4: 3 o’clock;
STEP 7: Silicone must be used in between overflow and tank. After screwing overflow to tank with six S/S grab screws use a hole saw to cut the hole between 50mm and 70mm;
STEP 8: We recommend that the After all tanks have been joined and overflow installed, slowly push them into position (Pro Plastics recommends 2 people when more than two tanks are placed into position).
NOTE: 1 litre of water is 1kg – hence 5000 litre tank is 5000kg or 5 tonne. Incorrect installation can be deadly. Please ensure you install your tank as per Instructions.
CONNECTING MULTIPLE TANKS – Best Practice
There are other ways to join tanks – this is our preferred way.
Step 1: Align the heights of the tanks overflows. The lower or smaller tank will need to be raised so the overflows are at the identical same height, or try to purchase tanks that same height. This will save some work.
Step 2: Only one overflow is required if you have one downpipe. The other tanks do not have a drilled overflow.
Step 3: Link the lowest outlets of each tank with a flexible hose. Usually you should start with the inlet at the smallest tank in the chain of tanks but it doesn’t really matter as long as each tanks outlets are at the same height.
Step 4: The water will now align/rise at the same height as water starts filling the tanks. Connect your pump to the outlet on the last tank in the chain.
MAINTENANCE OF YOUR RAINWATER TANK
Maintaining your rainwater harvesting system is a straightforward process, and doing so will ensure crystal clear fresh water all year round, for many years. We suggest periodically checking your inlet and outlet strainers, and confirming you have good water flow into and out of your tank.
Your maintenance frequency will depend on the amount of foreign debris your system is exposed to. Things like overhanging trees would require extra periodical checking and cleaning. A variety of accessories are available to help manage your maintenance cycle.
CLEAN WATER IN
The number one rule ‘clean water into your tank will give you clean water out’. Water tanks are supplied with inlet strainers with stainless steel mesh to prevent large objects from entering your tank. Additional filtration devices can be installed further up your downpipe including gutter guarding, automatic leaf filters and first flush diverters. Please see your water tank expert for information about these devices.
INLET STRAINER
Even if you have a leaf filter and a first flush diverter, you should periodically check and clean the stainless steel mesh of your inlet strainer to ensure your tank can receive full flow.
If a full clean is required you can unscrew and remove the strainer for cleaning, however in most instances you just need to ensure foreign objects such as leaf litter are removed from the basket area.
TANK BODY
The body of your tank is made from high quality food grade polyethylene. This material is non-porous and its smooth finish makes it difficult for sediment to stick to.
Typical tank sediment is not harmful and is best left undisturbed, however if you must clean the contents of your tank we recommend engaging a professional tank cleaner. They will likely employ a vacuum extraction method which can be conducted while the tank is still full of water.
ACCESSORIES
If your full system includes accessories such as a leaf filter, first flush diverter, and pump equipment, please see the manufacturer’s instructions for the appropriate maintenance schedule.