Uncategorized
How to Install a Water Tank
Oct
How to Install a Water Tank
This brochure contains general instructions on how to install a water tank. It also briefly covers how to manage the overflow and how to connect ball valves to your tank. Please note this is a general guide on how to install a water tank for most handypersons – we assume the installer has a degree of understanding of plumbing pipework.
-
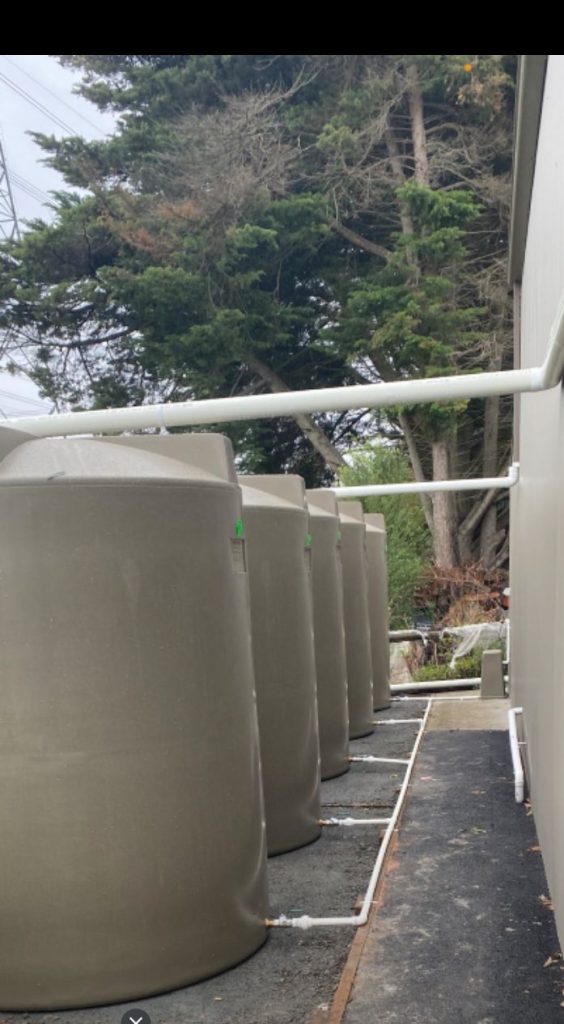
Positioning Your Tank
- If you know where you want to locate your tank, and your base is ready position the tank in on the prepared base.
- Consider the position of your tank’s overflow – there is usually a flat section at the top of the tank to allow for the overflow connection. Position the tank so the overflow is in the easiest location for how you plan to use it. This is usually closest to the down pipe.
- Consider the outlets on your tank – position the tank so the outlets are easy to reach. When your tank is positioned where you want it, add approximately 2.5cm of water to it to secure it in place with a little bit of weight.
-
Connecting Downpipe/s to Your Tank
Items you will most likely require:
- PVC piping (assuming 90mm diameter as this is standard on most tanks )
- PVC elbows – size as per piping
- PVC connectors – size as per piping
- PVC glue/cement
- PVC pipe holders (with anchor brackets)
- metal screws (self-tapping)
Tools you may require:
- ladder
- tape measure
- spirit level
- hacksaw
- drill and drill bits
- screwdriver
If you are installing a Leaf Eater Downpipe Rain Head or First Flush Diverter, installation instructions will be enclosed with the products.
Things to consider:
- Your local hardware or plumbing store will have what you will require for your water tank installation.
- Always purchase a little more PVC pipe that you think you may need in case you make any errors during the installation. This will save a mad dash to the hardware store during installation.
- A second set of hands often helps make the job al little easier.
- We suggest you position the PVC with the printing on them facing the wall so they’re less visible. Just easier on the eye in the long run.
- It’s best to draw a plan of how you will connect the downpipe/s to the tank – calculate how much pipe, and how many elbows and connectors you’ll need. This planning will often help in the long run.
- Remove the downpipe by cutting it to uncover the metal flange inside.
- We suggest you lay the pipework out on the ground in the same position that they will be installed. This allows you to see that you have all the parts required.
- Remember to sandpaper the edges of the pipes after cutting them – smooth them out.
- Glue to the joins of the pipework in sections and connect them quickly – before the glue dries.
- Drill holes in the PVC connector to accommodate the self-tapping screws.
- Screw the holding bracket mounts to the wall near the flange on a very slight downwards angle, which allows the water to flow towards the tank. (Use your spirit level to check the angle.)
- Continue then to connect and attach the remaining sections until the tank pipework is installed.
A note about expansion:
Polyethylene tanks will expand and contract. When filled with water the sidewalls may expand this is normal and will not effect the structural integrity. Please allow for this when installing the pipework and the placement beside a structure. Accordingly, please ensure there is 50mm gap between the tanks side wall and any brickwork or fences etc to ensure the tank is away from sharp edges.
-
The Overflow
When your tank is full, the overflow will direct water through the overflow pipe to release the extra water and pressure from the tank. This overflow water is required to be directed elsewhere ie back to stormwater or into garden etc.
Fitting your overflow
Often there are a number of overflow positions on each Tank. These are usually a flat surface at the top of the tank.
- After selecting the appropriate position for the overflow, drill a 95mm hole to accept the overflow (assuming you are using a 90mm overflow).
- Attach with the screws provided.
Plumbing your overflow
There are a few options for managing the overflow from your tank:
- The overflow is required to be plumbed away from the tanks base. To ensure the base is not compromised. Some customers direct the overflow into their garden or into their pool etc. Check with your local council if this overflow system is suitable.
- Most commonly the overflow water is directed back into your stormwater system. You can connect the overflow back to the downpipe you have connected your tank to, or connecting the overflow directly into the underground stormwater pipes on your property.
-
Connecting the fittings
Most Tanks will be supplied with one, two or more threaded outlets already moulded into the tank.
If you choose to use a ball valve, the installation is easily done by matching their threads with the thread in the outlets. To ensure a good seal, apply some thread tape to the fittings before carefully screwing them into the outlets using a shifter or a spanner. If you are using brass ball valves please ensure you are careful when installing them as to not to damage the thread.
Installing a pump
If you buy a pump to connect to your Tank, installation instructions will be enclosed with the pump box. Please see our pump range to select a pump that suits your requirements – or please chat with us.
Note: If you are connecting your water tank to a mains connected pump (ie for toilet and washing machine), connections must be completed by a licensed plumber in accordance to the Plumbing Code AS/NZS3500. Garden pumps or pumps without mains connection can be installed by a handyperson or someone with experience.
5. Testing
With just a few steps, you can inspect your tank and test that it is ready for use:
- Check that all of the tank’s fittings, such as the leaf strainer, are correctly inserted and secured.
- When your tank fills with rain water, check the connections for any drips.
-
Cleaning and Maintenance
Water Tanks require a little bit of maintenance.
- Check and clean your gutters, roof and tank strainer.
- It’s always a good idea not to have trees sitting directly above the tank as these will drop lots of residue into your tank.
- Over time sludge may build up at the bottom of your tank – accordingly it is suggested that this is cleaned every two to three years if necessary.
We hope this brochure on how to install a water tank is useful.
Please see a list of qualified plumbers here: Need a Plumber?
If you would like some clarification on this brochure on how to install a water tank please contact us Contact Us